So neat, really this could be used any where as magazine rack, in you're sewing or crafting room, kid's room for storage or even in your living room for mail and toys too as easy pick-up, so many things!!! :)
Labels
- Pin of the Week
- For the Home
- For Kids
- Cleaning and Alternatives
- DIY Gift Ideas
- For the Holidays
- How To's by My Design
- My Drawings
- Pretties to Wear
- Recipes
- Trash to Treasure
- In My Home
- Let's Get Organized
- Remakes from Pinterest
- Crafty Creations
- Crocheting
- Patio/Garden
- Have A Crafty Christmas
- Patterns
- Photography
- 4-H of Howard County Indiana
- Creative Beauty Ideas/Tips
- For the Critters
- Frugal Living
Saturday, August 25, 2012
The Easiest Recycling Project EVER!!!
Great Recycling Project and ever so simple!!! Just Save TP rolls and get out your hot glue gun, maybe some spray paint, and BOOM! Awesomeness! Found on Pinterest, and you can find it on one of my many boards. ;)
Mouse Traps...Who knew!
And if you look in the "Remakes from Pinterest" tab you'll see I have post the remake the day before this post! :)
Art on the Wall
Collage Flower from Pinterest

And I've already done a remake of this, and you can see mine in the "Remakes from Pinterest" tab!!! Enjoy!
Pins of the Week from April 1st, 2012 - July 8th, 2012
***Sorry Everyone this is what I had posted before I discovered "labels". ***
Pin of the Week for July 1st - July 8th
Pin of the Week for June 24th - July 1st
I'd use this as a shoe storage in my little girls room, or for supplies in a sewing/craft room. It's simple and green! You can find it's original site:
http://www.curbly.com/users/diy-maven/posts/9755-getting-organized-home-office-inspiration-how-tos
Pin of the Week for June 17th - June 24th
Okay, if you're broke like me, this is like the best idea EVER!!! lol And/or if your kitchen is small like mine I would suggest putting wheels on the bottom! ;) Really another thing too I have a toddler who likes to make a mess of everything so if you also don't want buy something so expensive that you really can't afford to get tore up and need replaced in the next 5 yrs, another reason why this is a great idea. Save your money and DIY and then go vacation with the family.
http://www.thenester.com/2011/05/bird-watching-52.html
http://www.thenester.com/2011/05/bird-watching-52.html
Pin of the Week for June 10th - June 17th
Love thus!!! Looks pretty easy and self explanatory, but here the site: http://thebbcreative.wordpress.com/2011/09/18/diy-jewelry-organization-roundup/
Pin of the Week for June 3rd - June 10th
Genius! Spray paint a branch and attach to the wall for a curtain rod
Pin of the Week for May 27th - June 3rd
Sorry I don't have to much to share on this, the site was something other than english but it has a decent visual for the idea.
Pin of the Week for 20th - May 27th
DIY Garden Planter & Birds Bath
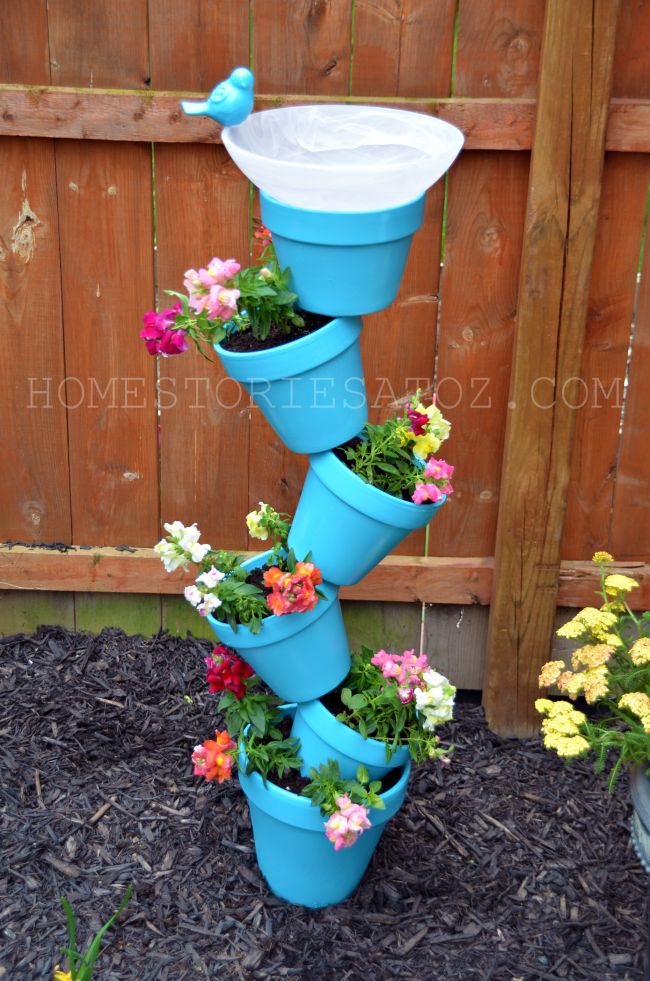
I shared yesterday that I was working on a diy garden project that was for the birds! Our Lowes Creative Ideas Network challenge this month was to create a diy bird feeder or birdbath. After Matt’s failed attempt at creating a bird feeder, I just went ahead and purchased a cute feeder from Lowes. However, I had this fun idea to create a planter and bird bath in one and today I’ll show you how to make your own!
Supplies needed:
NOTE: Please use your own measurements and judgement when recreating this project. These are guidelines to follow and you shouldn’t necessarily even want to copy my project exactly. Be creative and add your own flair, pot sizes, rebar size, birdbath top, paint color, etc.
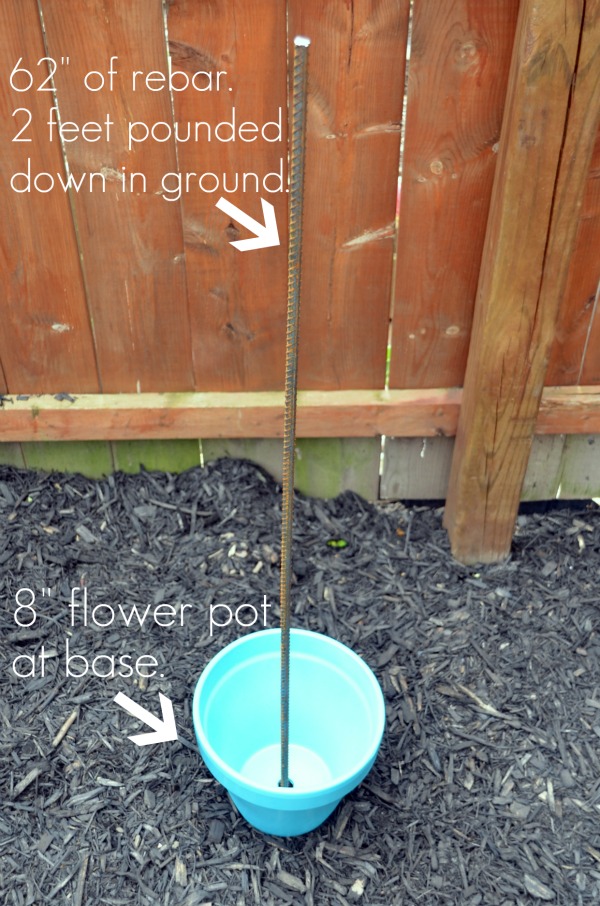
- 1 8″ tall terracotta pot for the base
- 4 6″ tall pots
- 1 4″-5″ tall pot
- 62 inch piece of rebar (I bought a 10ft piece from Lowes and had Matt cut it to size with a hacksaw. Lowes will cut if for you if you ask.) **Edited to add: My Lowes said they could cut it for me; however, someone had trouble getting their rebar cut by Lowes so you might need to purchase a hacksaw for this project. It’s $5.
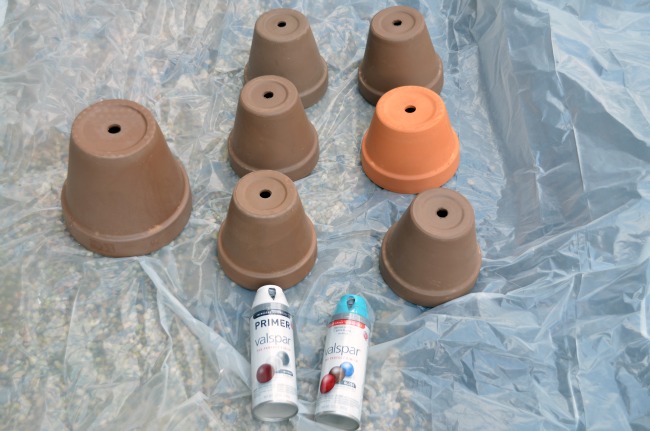
- Spray paint primer. (I used Valspar primer.)
- Spray paint in your color choice. (I used Valspar in Exotic Sea.)
- Discarded globe from “boob light”.
- Little ceramic bird (Optional but uber cute.)
- DAP Household/Aquatic Adhesive
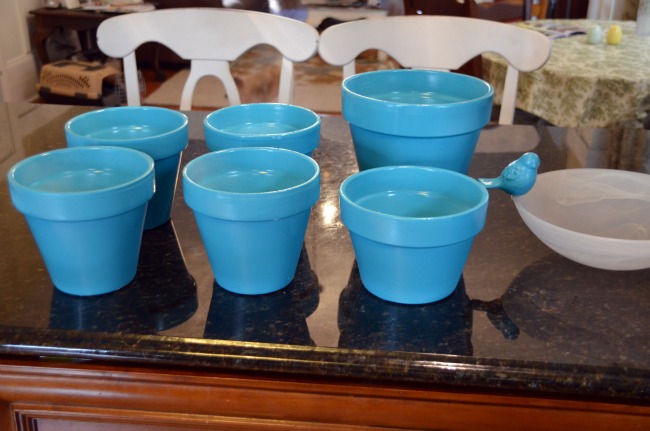
Step 1: Prime all of your pots and then spray paint them in whichever color you choose. This was my first time using Valspar spray paint and I have to say that I wasn’t a huge fan of the primer, but I loved the paint! The primer seemed to splatter a bit out of the can and it took two cans of primer to thoroughly cover the pots. Granted, I didn’t seal the pots before painting so they were thirsty for the primer! However, I used less than one can of Valspar’s gloss spray paint in Exotic Sea on all of the pots and on the birdie. I love this fun color for the garden!
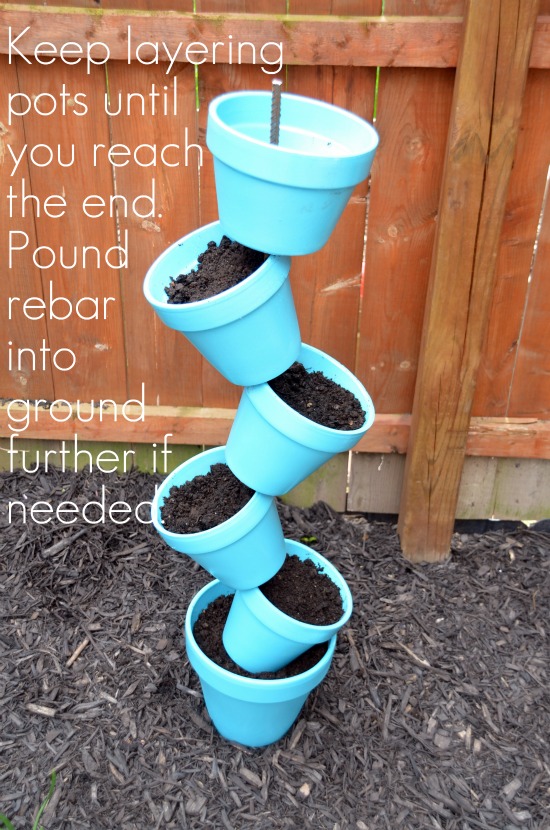
Step 2: Measure the height of all of your pots and then add 24 inches to that number to determine the length of your rebar. Cut your rebar to size using a hacksaw. Use a hammer to pound the rebar into the ground at least two feet down so that it will hold your heavy pots.
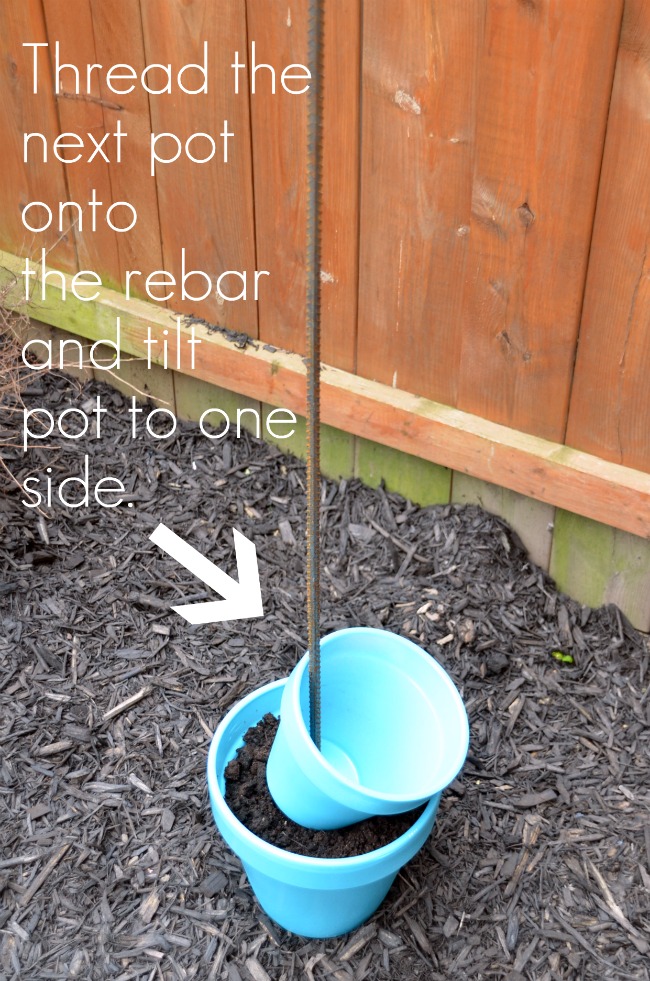
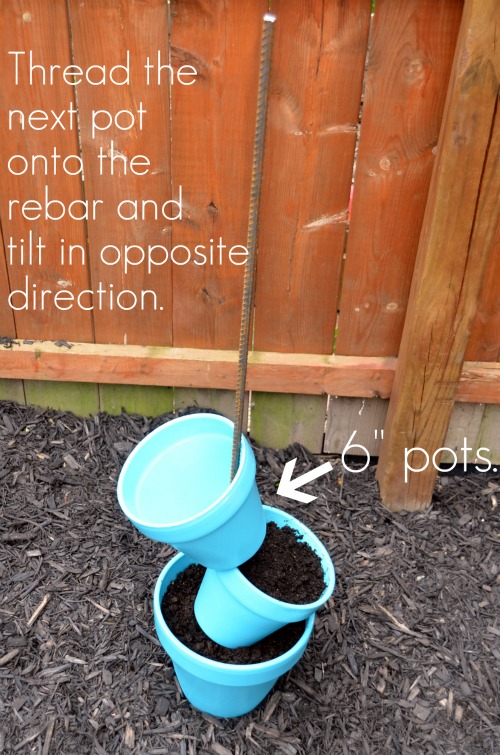
Step 3: Thread your pots onto the rebar and fill with soil. Alternately tilt each pot from right to left, filling with soil as you go.
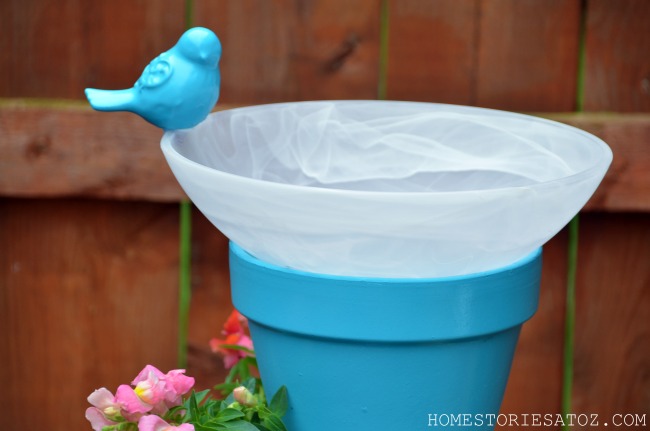
Step 4: Take the globe from one of your discarded “boob lights” and place it onto the top of the rebar. The bowl will be resting on the top flower pot but the rebar should thread all the way up into the birdbath bowl. I used DAP household/aquatic adhesive to attach the bird and to seal around the gap between the bowl and rebar hole. The adhesive takes a day to cure, so I’m not able to fill my bowl with water yet.
Step 5: Plant your flowers and enjoy!
For more DIY bird feeder, birdhouse, and bird bath projects be sure to check out Lowe’s Creative Ideas Magazine!Pin of the Week for May 13th - May 20th
Make a pearl and ribbon necklace or bracelet. So elegant! @
Pin of the Week for May 6th - May 13th
Layed down lace then spray paint! @ http://roadkillrescue.net/2012/05/doily-design-chair/Pin of the Week for April 29th - May 6th
Sewing together pot holders to make a rug! Brilliant!
Pin of the Week for April 22nd - April 29th
Love this!!! And actually making me a pair soon! There was no link for me to tell you how to do this but it's quite simple. Go to your local fabric/craft store, find "fabric" paint, be sure to read the directions because different brand have you finish in different ways. Wash you pants (new or used) without fabric softener before you begin. You can make you own stencils if you need to and when you're done painting be sure to read the directions on the paint so your paint stays on and doesn't ruin your pants.
Pin of the Week for April 15th - April 22nd
Bird bath made from painted flower pots. You can see how it's done @http://theculinarycougar.wordpress.com/2010/05/30/more-backyard-inspiration/
Pin of the Week for April 8th - April 15th
Paper cocktail parasols – available at party supply stores – are fun and festive. I made this simple project by sticking the parasols into a grapevine wreath and in minutes, I had a bright new look. You could also use a foam wreath. @ http://cfabbridesigns.com/holidays/christmas/easy-easter-wreath/?utm_source=feedburner&utm_medium=feed&utm_campaign=Feed:FamilyChicFamilyChic
Pin of the Week for April 1st - April 8th
Simple and cute. Really think this would work out in most homes and rooms! :)
Tye-Dye with Sharpie
(from Pinterest)
(and mine and my daughters)
You can find these on my Pinterest, just click the "Follow me on Pinterest" button to the left and check it out and get the "How To", also I'll throw out there that I didn't care for the "cup" technique, I used a medicine dropper for the alcohol, and put a plastic sack underneath to prevent bleeding through.
The Mouse Trap Magnets / Key Holder
This idea will be posted for the Pin of the Day, Monday, March 19th, 2012. This is quite easy, I hot glued the magnets for the fridge and nailed thru the one's as key holders to the wall. Some paint, and some adhesive letters. I could have done more to decorate but I already have a lot going on in my house so I didn't want it to look too busy, more simple on this one. :)
The Collage Flower
This is a Pin of the Day, for March 18th, 2012. This piece was quite easy. I think they may have used fabric on the one from Pinterest, but I already have a technique for paper/canvas. And I'll give you MY How To: 1) Paint Canvas (Black seems to make the colors of your paper to pop out). 2) I used scrapbook paper and cut out leaf shapes, and one circle. ( I also you this and the product for the next step in ALL my collage projects.) 3) I used an Acrylic Medium, Matte Medium Gel to glue/seal w/ a brush for each leaf. (This can be found in the art isle of your local craft store, it is made for the canvas but I use for other things as well but that's for a different time.) 4) After I have gotten everything glued down, I went over the whole canvas w/ the gel and a flat 1in. paint brush to seal it. (Mine looks shiny because it was still drying.) 5) OPTIONAL- If you'd like you can give it a back to hang or you can hang it by the wood behind it.
(This piece is what is going to bring all my collage and art projects I have recently done for my "living room re-do" altogether! Hope you enjoy! :)
Rylie's "ART" Project
DIY - Dryer Sheets
Okay, if you're like me, we pretty much live paycheck to paycheck. And I noticed I had one dryer sheet left right when I was about to start laundry.... I HAVE TO HAVE MY DRYER SHEETS!!! But I found a solution!
I googled it, I pretty much done it the same as this site (which I no longer have sorry), but they were using an organic product which was the only difference. And so, my boyfriend was throwing out his old white T's last week, and I told him NO! I can always recycle them for something! So I cut them up into somewhat the same size as my dryer sheet squares. Got a large tupperware container added some fabric softner (how much you use is your choice, I used about as much as I would for a large load of laundry, which still isn't much [because softner can make you break-out and isn't good for your skin depending on your skin reacts]). Then added water about 2 inches from the top; threw in my T-shirt squares, and you're done! Just toss them in the dryer with your wet clothes to dry with, and when you pull out your dried clothes just put them back in the container. ALSO, if you were wondering, it DOES still take out the static! I thought is wouldn't be as effective because of the material the actual dryer sheets are made of, but it is. Hope this helps some of you.
Saving a Lamp from the Dumpster
Supplies:
- Paint Brush (s)
- Primer (you can use regular white crafters paint on this one, but the best primer I like to use is "Gusso" found in the art/painting isle.)
- Paint - color(s) your choice
- scrapbook paper
- Buttons
- Hot Glue-Gun
- Scrapbook adhesive stickers (your choice) - and/ or - picture cut outs.
- (A Lamp Shade if you do NOT already have one.)
- Matte Medium Gel (found in the art/painting isl of your local craft store.) And here's a picture of my preferred brand, and also so you know what you're looking for:
Directions:
- Wash off the lamp of all dust and dirt. (I prefer to use wet wipes, because they're actually really good for that and many other things!)
- Begin to prime everything you plan to paint and collage.
- After that dries, paint all of the surface you want the paint to show. (DO THIS BEFORE THE COLLAGE!!!)
- Then you take your scrapbook paper and tear it to whatever size you want, some will be BIG / SMALL REGARDLESS, and if you are working with a Curvy Lamp, it's a bit more tricky like a puzzle and you'll definitely have those smaller pieces. After that, you take a small flat paint brush then brush on your matte gel to the back side of your torn piece of paper and place to glue it to the lamp. NOW DON'T FREAK OUT! It may not stick very well, so I get some more gel on my brush and brush it over that piece of paper. It's seals it and glues all down. (Also, I like to tear my paper into whatever pieces/ shapes as I go, because like I said, it's kind of like a puzzle and certain shapes fit better in certain areas/ doesn't over lap with the same pattern of paper.) And you continue until you see no more primer and the collaged area is filled.
- Any adhesive scrapbook stickers or cut outs you add now. Cut outs go on the same way you as you had put on your paper, with the matte gel.
- Once you're finished adding the stickers/ cut outs and it's DRY, you can add your buttons however many / wherever on your lamp with the hot glue gun.
- Then put in back together (shade/bulb), plug it in and sit back for an hour or so and admire your work! ;)
(half-way done, collage area is filled.)
Sunday, August 12, 2012
Subscribe to:
Comments (Atom)


